Calculator
(3D 오브젝트의 길이, 넓이, 부피, 중심좌표 계산)
1. 작업 의도
![]() 3D 모델링 작업의 편의를 위해 오브젝트의 길이와 넓이, 부피, 중심 좌표를 계산하는 간단한 계산기를 만들었습니다.
3D 모델링 작업의 편의를 위해 오브젝트의 길이와 넓이, 부피, 중심 좌표를 계산하는 간단한 계산기를 만들었습니다.
1) vertex 길이
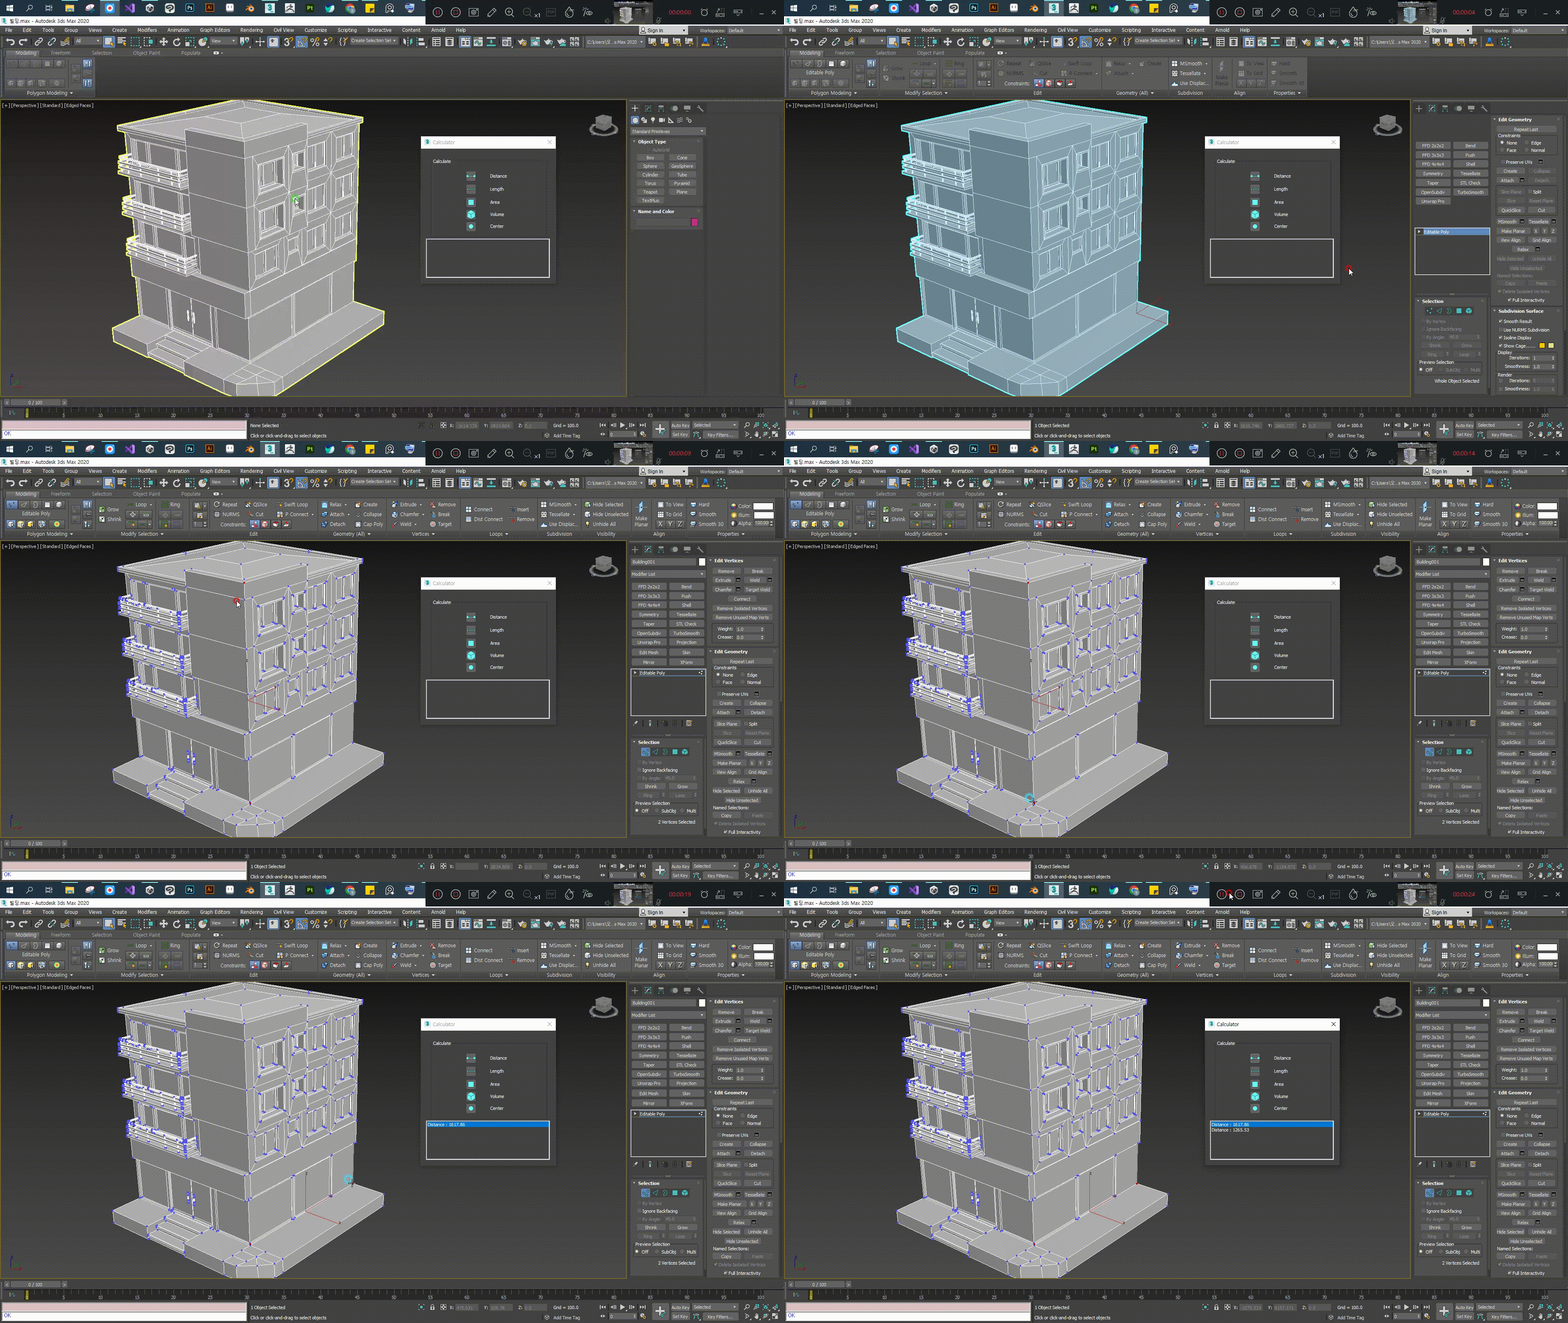
사용자가 선택한 두 버텍스 사이의 길이를 측정할 수 있습니다.
2) edge 길이
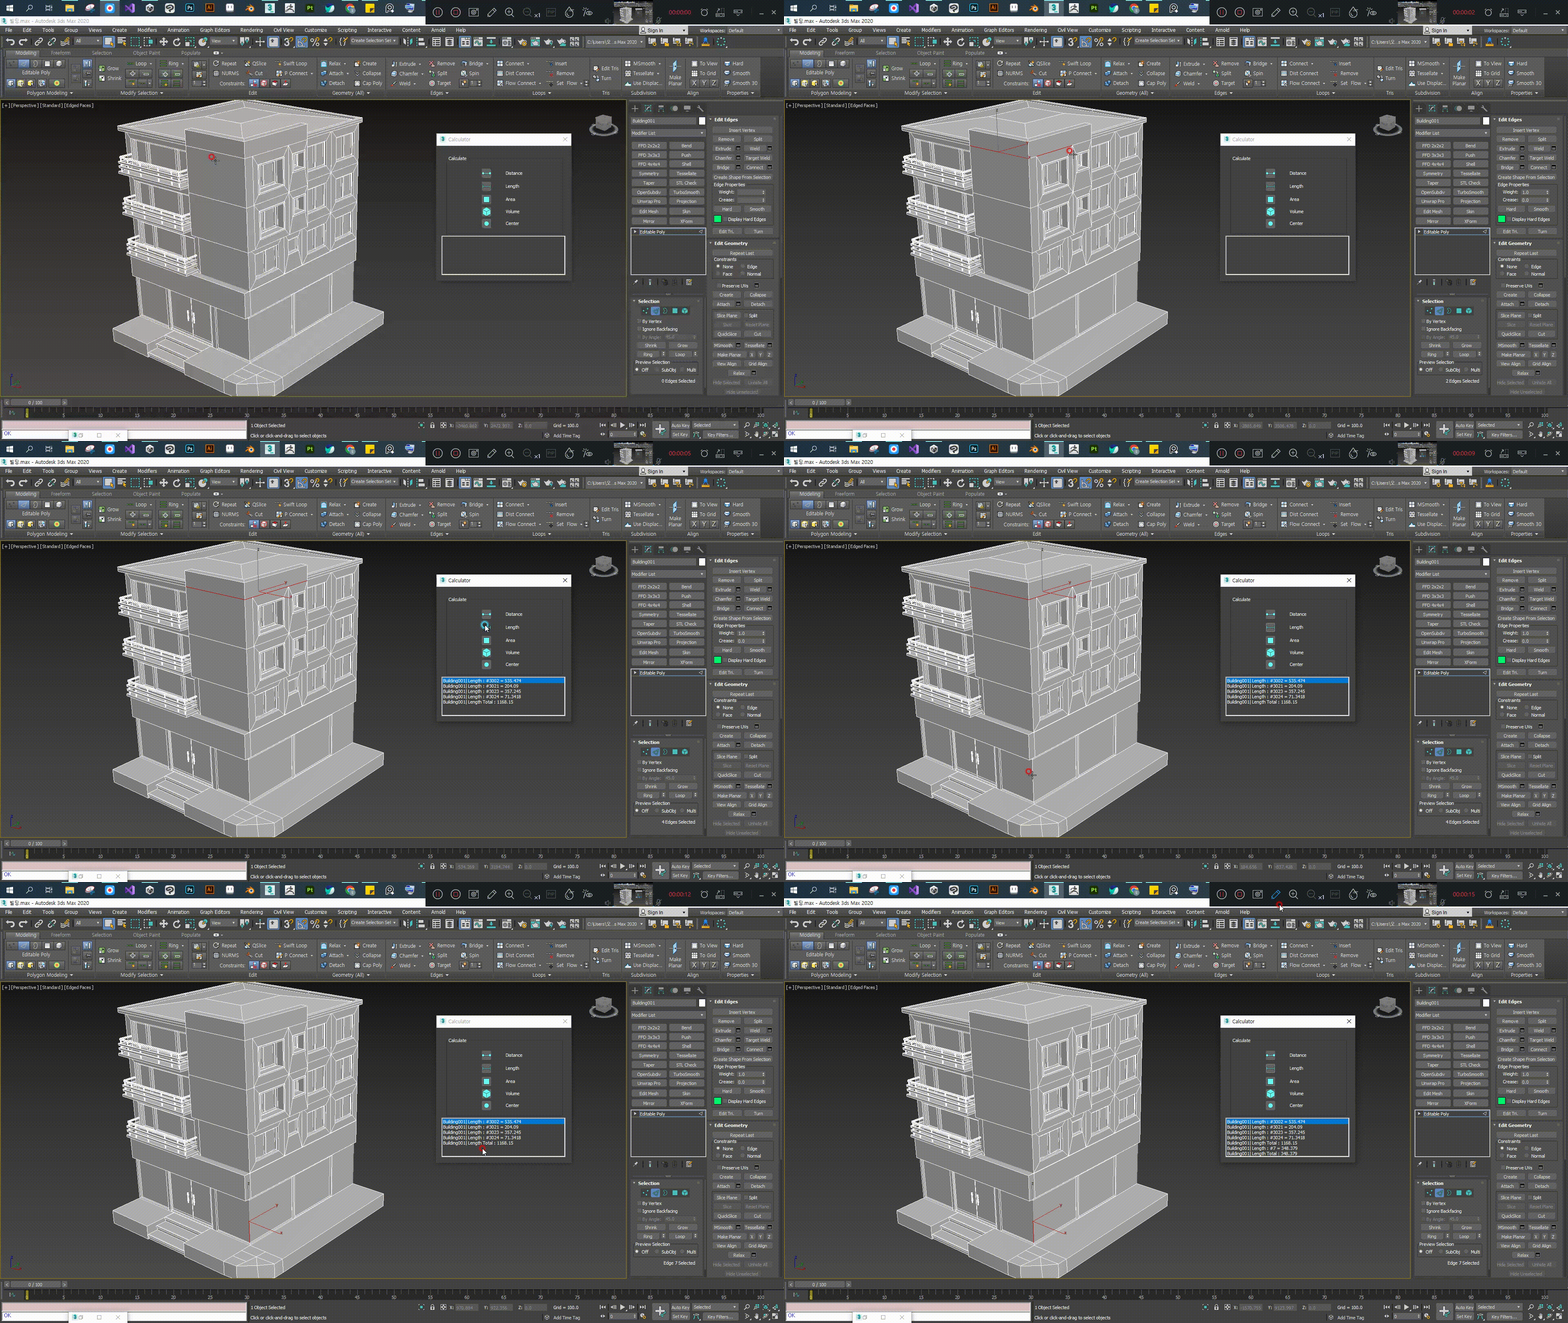
사용자가 선택한 다수의 선의 길이를 측정할 수 있습니다. 각 선의 길이와 총 길이를 출력합니다.
3) polygon 넓이
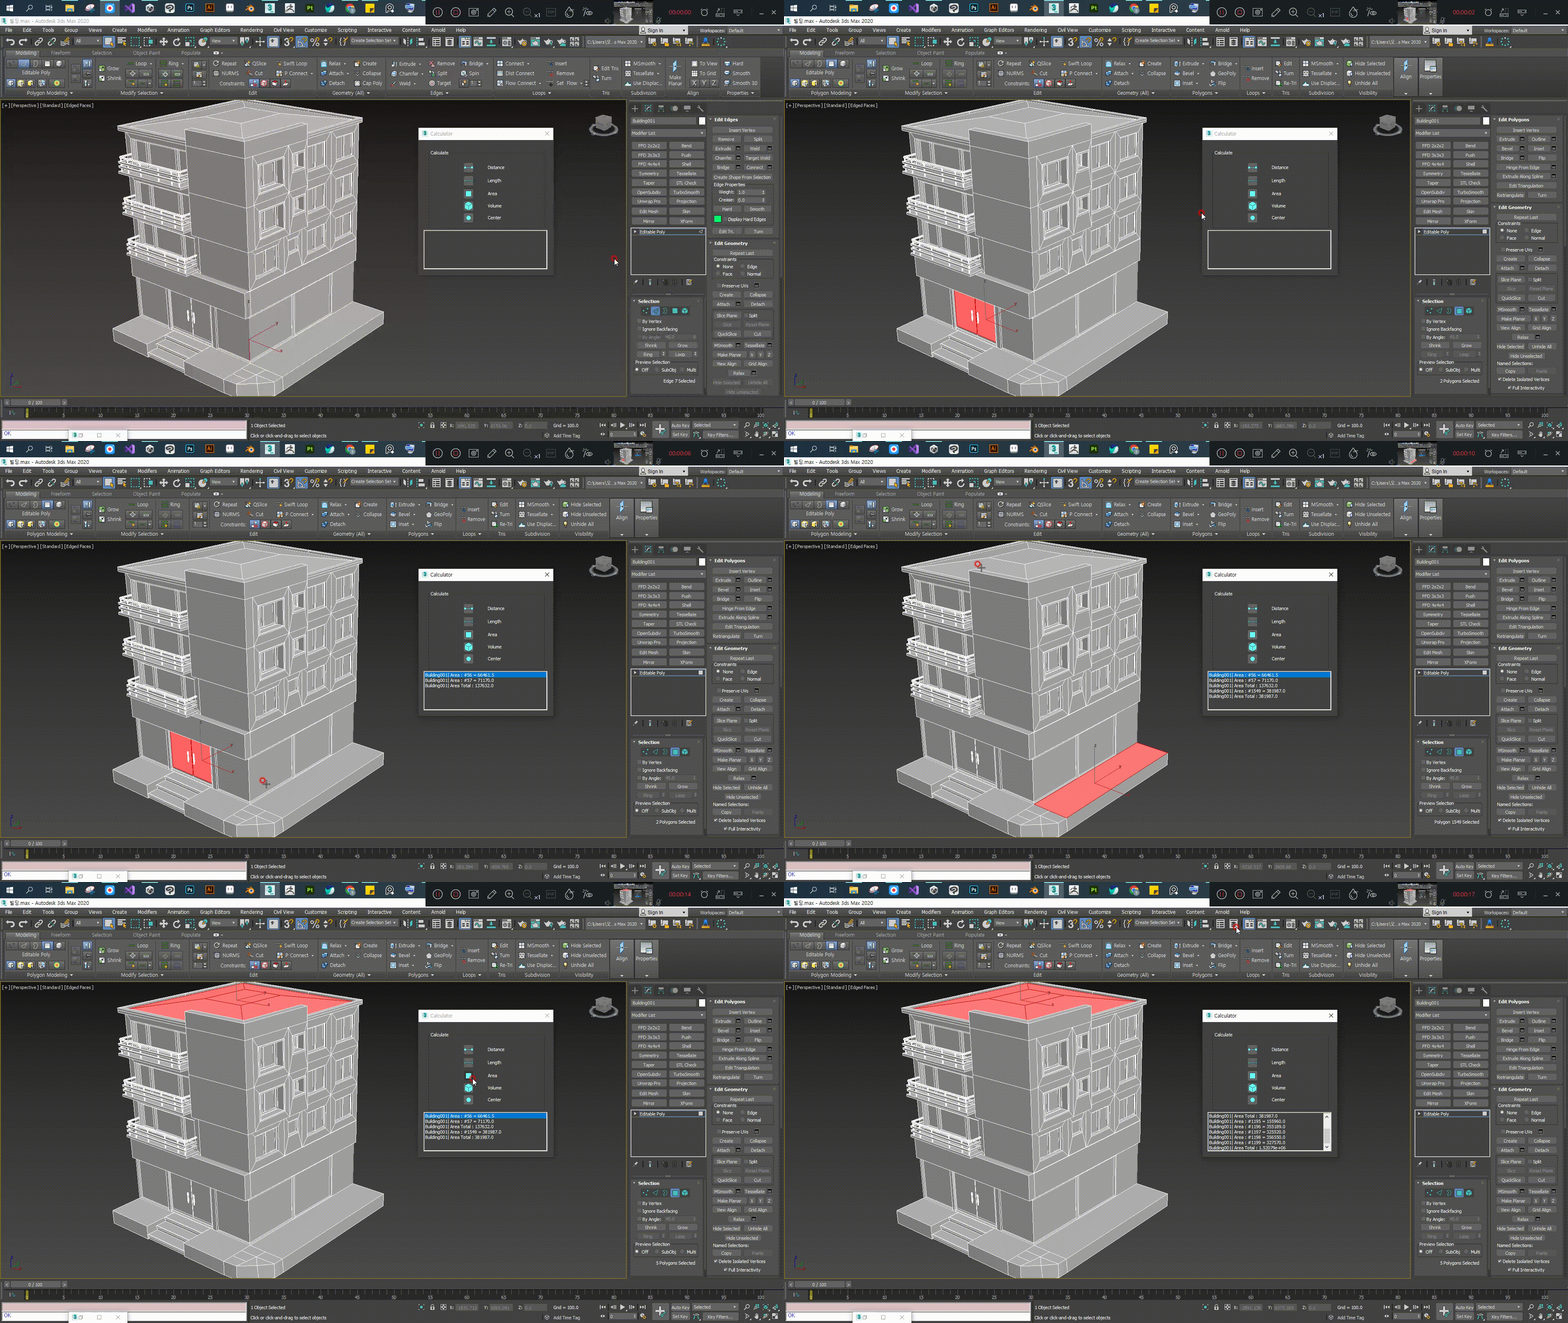
사용자가 선택한 다수의 폴리곤 면적의 넓이를 측정할 수 있습니다. 각 면적의 넓이와 총 넓이를 출력합니다.
4) volume
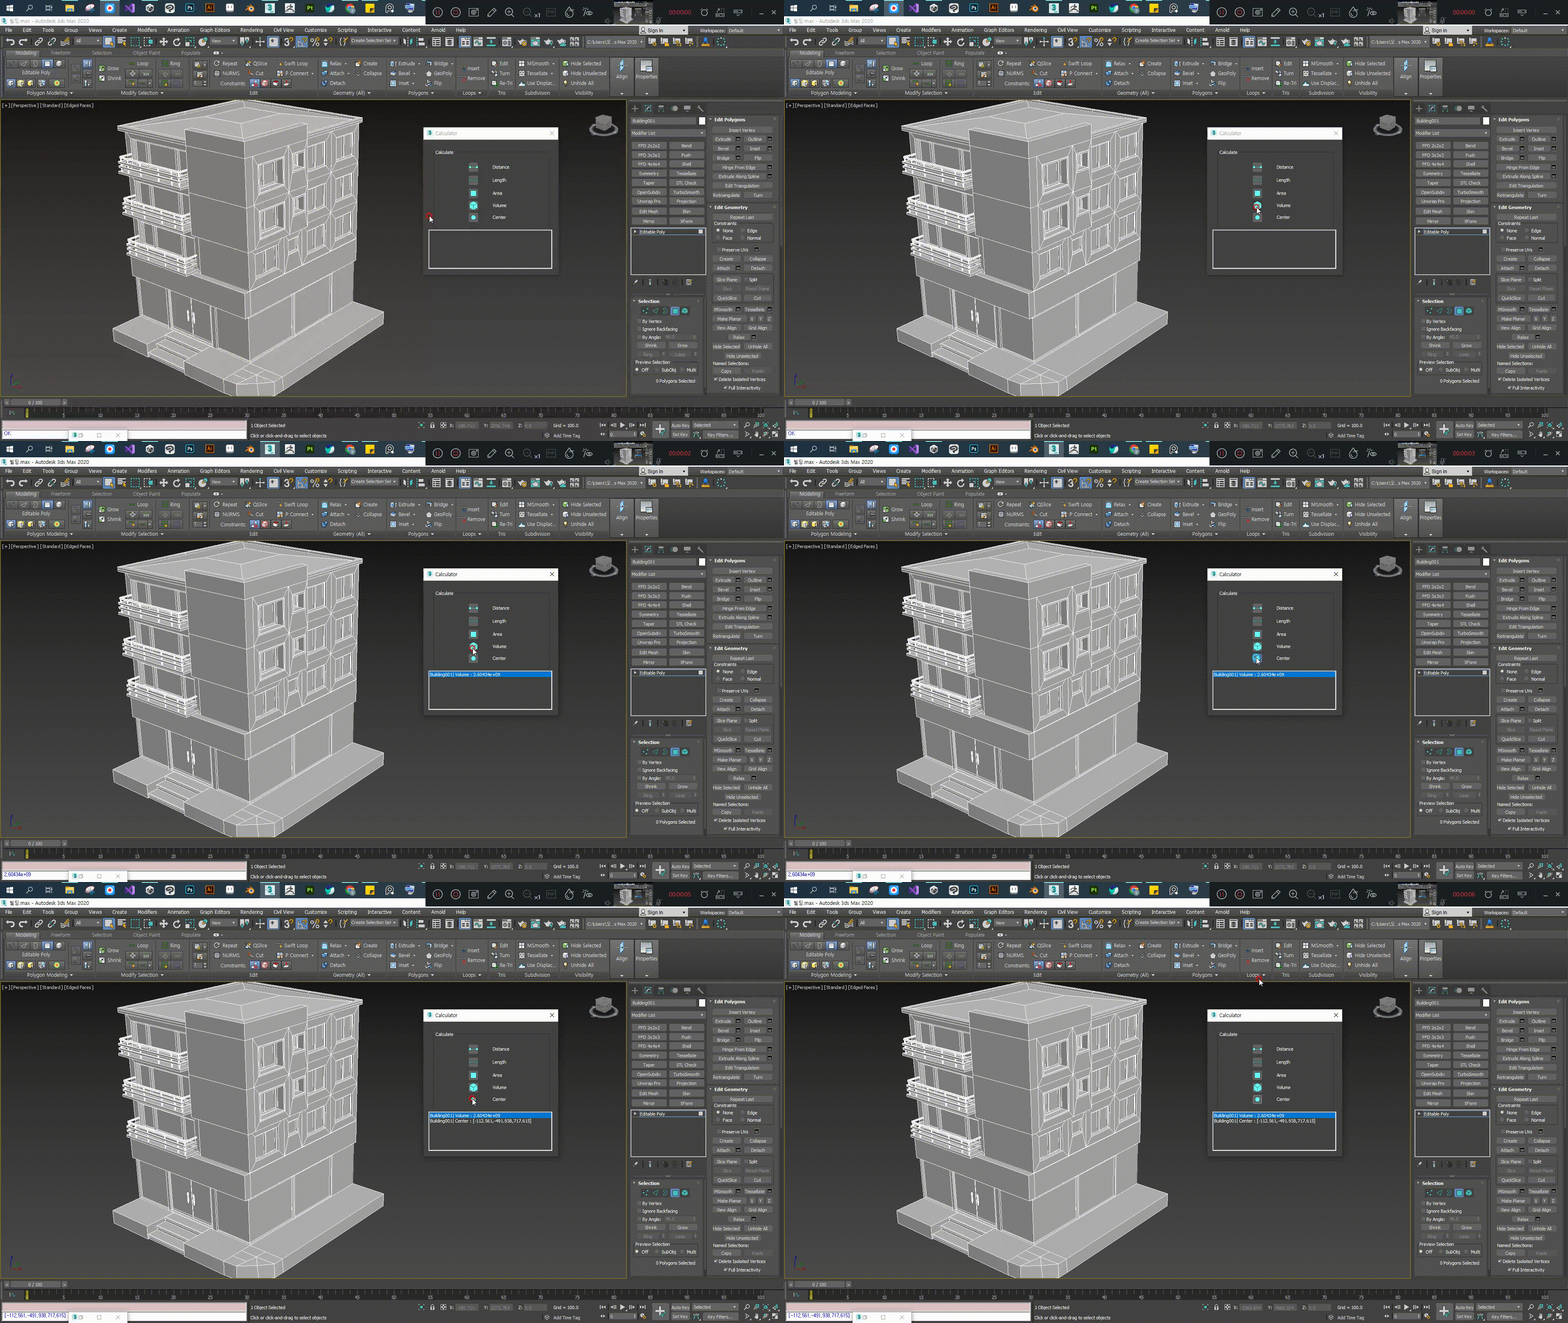
사용자가 선택한 오브젝트의 부피를 출력합니다.
5) 중심 좌표
사용자가 선택한 오브젝트의 중심좌표를 출력합니다.
2. 작업 과정
![]() 소요 기간: 약 5일
소요 기간: 약 5일
![]() maxscript로 작성
maxscript로 작성
1) vertex 길이
fn getDistance EPolyD aVert =
(
	try
	(
		VertPositionD = for iVert in aVert collect
		polyop.getVert EPolyD iVert
		return (distance VertPositionD[1] VertPositionD[2])
	)
	catch()
)
사용자로 부터 버텍스 2개를 입력받습니다. 여러 개를 입력 받아도 1,2번째만 리턴합니다. 혹시 오브젝트 바깥의 버텍스를 클릭한 경우 트라이 캐치 예외 처리를 하였습니다.
on disbtn pressed do
	(
		EPolyD= selection[1]
		aVert = polyop.getVertSelection EPolyD
		disVal = getDistance EPolyD aVert

		listBox.items = append listBox.items ("Distance : " + (disVal as string))
	)
버텍스 사이의 거리를 구하는 버튼을 클릭하면 배열에 담아 함수의 매개변수로 넘깁니다. 함수 결과값을 출력합니다.
2) edge 길이
fn getLength EditablePoly iEdge =
(
	try
	(
	    local aiEdgeVerts = polyop.getEdgeVerts EditablePoly iEdge

        local VertPosition = for iVert in aiEdgeVerts collect
		polyop.getVert EditablePoly iVert

        return (distance VertPosition[1] VertPosition[2])
	)
	catch()
)
선택한 엣지의 양쪽 끝 버텍스의 좌표를 구하여 거리를 구한 후 반환합니다.
on lenbtn pressed do
	(
		total = 0
		EPoly = selection[1]
		aEdge = polyOp.getEdgeSelection EPoly

		for ed in aEdge do
		(
			LengthValue= getLength EPoly ed

			listBox.items = append listBox.items (($.name as string) +"| Length : #"+(ed as string) +" = " + (LengthValue as string))

			if aEdge.count >1 do
			(
				total += LengthValue
			)
		)
		listBox.items = append listBox.items (($.name as string) +"| Length Total : "+ (total as string))
	)
edge의 길이를 array에 담아 반복문을 통해 각 edge의 길이를 출력하도록 하였습니다.
3) polygon 넓이
fn getfaceArea EPolyArea face =
(
	try
	(
	local theArea= 0.0
	theArea = polyop.getFaceArea EPolyArea face
	return (theArea)
	)
	catch()
)
반복문을 통해 선택한 폴리곤의 번호를 매개변수로 넘겨서 면적을 구한 후,각 폴리곤의 면적값을 출력했습니다.
on areabtn pressed do
	(
		areaTotal = 0
		EPolyArea = selection[1]
		aMyselection = EPolyArea.GetSelection #Face

		for face in aMyselection do
		(
			AreaValue = getfaceArea EPolyArea face
			listBox.items = append listBox.items (($.name as string) +"| Area : #"+(face as string) +" = " + (AreaValue as string))

			if aMyselection.count >1 do
			(
				areaTotal += AreaValue
			)
		)
		listBox.items = append listBox.items (($.name as string) +"| Area Total : "+ (areaTotal as string))
	)
4) volume
fn getVolume obj =
(
	local Volume= 0.0
	local theMesh = snapshotasmesh obj
	local numFaces = theMesh.numfaces
	for i = 1 to numFaces do
	(
		local Face= getFace theMesh i
		local vert2 = getVert theMesh Face.z
		local vert1 = getVert theMesh Face.y
		local vert0 = getVert theMesh Face.x
		local dV = Dot (Cross (vert1 - vert0) (vert2 - vert0)) vert0
		Volume+= dV
	)
delete theMesh
Volume /= 6
print(Volume)
)
on volbtn pressed do
	(
		print "volume"
		vol= getVolume $
		listBox.items = append listBox.items (($.name as string) +"| Volume : "+(vol as string) )
	)
maxscript help의 예제를 참고하였습니다. 현재 선택한 오브젝트를 매개변수로 하여 함수를 호출합니다. face의 갯수만큼 반복문을 돌립니다. x,y,z축과 메쉬의 버텍스 값을 이용해 부피를 구합니다. 이 부분은 수학적으로 더 연구가 필요할 것 같습니다.
5) 중심 좌표
fn getCenterOfMass obj =
(
	local Volume= 0.0
	local Center= [0.0, 0.0, 0.0]
	local theMesh = snapshotasmesh obj
	local numFaces = theMesh.numfaces
	for i = 1 to numFaces do
	(
		local Face= getFace theMesh i
		local vert2 = getVert theMesh Face.z
		local vert1 = getVert theMesh Face.y
		local vert0 = getVert theMesh Face.x
		local dV = Dot (Cross (vert1 - vert0) (vert2 - vert0)) vert0
		Volume+= dV
		Center+= (vert0 + vert1 + vert2) * dV
	)
delete theMesh
Volume /= 6
Center /= 24
Center /= Volume
print(Center)
)
on cenbtn pressed do
	(
		print "center"
		cen= getCenterOfMass $
		listBox.items = append listBox.items (($.name as string) +"| Center : "+(cen as string) )
	)
maxscript help의 예제를 참고하였습니다. vert0부터 2까지 더하고 부피값을 곱해준 후 24를 나눠준 후, 부피값으로 또 나눠줍니다. 이부분 역시 수학적 연구가 더 필요할 것 같습니다.
3. 결과물
*마우스 오른쪽 버튼 > 새 탭에서 열기 (원본 사이즈의 이미지가 열립니다.)
![]() maxscript를 처음 접하여 help문서를 참고하며 작성하였고, 툴 기획과 아이콘, 알파 아이콘을 직접 제작하였습니다. 혼자 제작한 프로젝트라 어려움도 있었지만 보람있었습니다. 간단한 코드임에도 아직 익숙하지 않아서 제작에 시일이 다소 소요된 것 같습니다.
maxscript를 처음 접하여 help문서를 참고하며 작성하였고, 툴 기획과 아이콘, 알파 아이콘을 직접 제작하였습니다. 혼자 제작한 프로젝트라 어려움도 있었지만 보람있었습니다. 간단한 코드임에도 아직 익숙하지 않아서 제작에 시일이 다소 소요된 것 같습니다.
